top
RubyのGUIソフトの「Shoes」のStylesの使い方を紹介します。
top
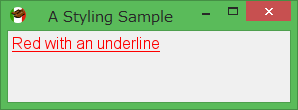
文字色を指定し、下線を表示します。
Shoes.app title: "A Styling Sample" do
  @text = para "Red with an underline"
  @text.style(stroke: red, underline: "single")
end
Shoes.app title: "A Styling Sample" do
  @text = para "Red with an underline"
  @text.stroke = red
  @text.underline = "single"
end
位置の指定をします。
Shoes.app title: "A Styling Sample" do
  @text1 = para "left"
  @text1.align = "left"
  @text2 = para "center"
  @text2.align = "center"
  @text3 = para "right"
  @text3.align = "right"
end

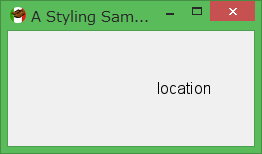
数値で位置の指定をします。
Shoes.app title: "A Styling Sample" do
  @text1 = para "location"
  @text1.top = 45
  @text1.left = 145
end
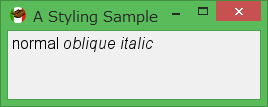
字体の指定をします。
Shoes.app title: "A Styling Sample" do
  @text1 = para "normal"
  @text1.emphasis = "normal"
  @text2 = para "oblique"
  @text2.emphasis = "oblique"
  @text3 = para "italic"
  @text3.emphasis = "italic"
end
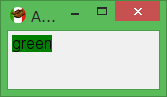
背景色の指定をします。
Shoes.app title: "A Styling Sample" do
  @text1 = para "green"
  @text1.fill = green
end
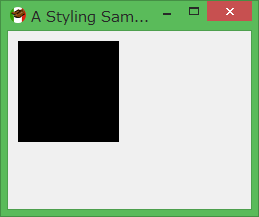
高さと幅の指定をします。
Shoes.app title: "A Styling Sample" do
  @r = rect 10,10,10,10
  @r.height = 100
  @r.width = 100
end
表示、非表示の指定をします。
Shoes.app title: "A Styling Sample" do
  @r = rect 10,10,10,10
  @r.hidden = true
end
下線、二重下線、下線なし、エラー下線の表示をします。
Shoes.app title: "A Styling Sample" do
  @s = para "single"
  @s.underline = "single"
  @d = para "double"
  @d.underline = "double"
  @d = para "none"
  @d.underline = "none"
  @d = para "error"
  @d.underline = "error"
end

文字の太さを指定します。
Shoes.app title: "A Styling Sample" do
  @t1 = para "100\n"
  @t1.weight = 100
  @t2 = para "700\n"
  @t2.weight = 700
  @t3 = para "900\n"
  @t3.weight = 900
end